This feature was requested by many of our customers, and we are proud to say that it is finally available. With it, it will be easier to create more effective and functional email marketing campaigns using Mailrelay. Many of you have a blog you need to always keep updated with the latest contents, so that your subscribers are always aware of what is new. The Mailrelay team accepted the challenge and decided to further improve Our platform to make this task easier, therefore, from now on you can send your posts via RSS automatically. You want to know all the details about this new feature? Continue reading as this article will explain everything you need to know.
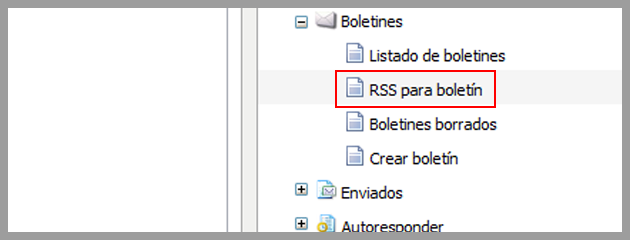
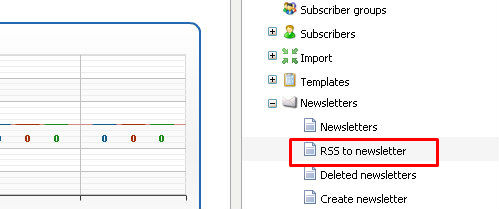
The feature works as follows. You just have to select the RSS source, which is usually in your blog or website, configure the sending frequency, as well as certain parameters. After that, you only have to design the newsletter, the rest is done automatically by the Mailrelay software. As we want you to understand the process, we will set up a test for you to see how the feature works. The first thing to do is to access the menu Newsletters, in this menu you will see a new option, RSS to Newsletter:
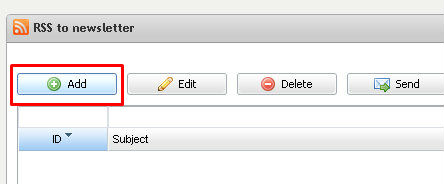
This is the option you will use to create a campaign by RSS. The process is very easy, after opening this menu you can click the button Create:
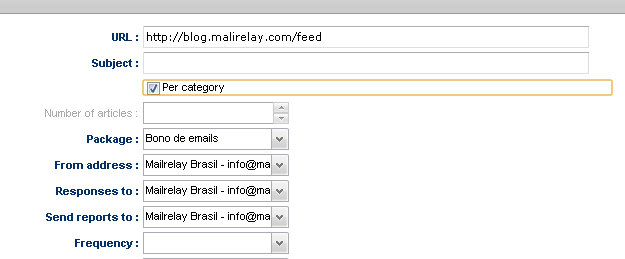
After clicking this button you will view a screen where you can configure the campaign by RSS:
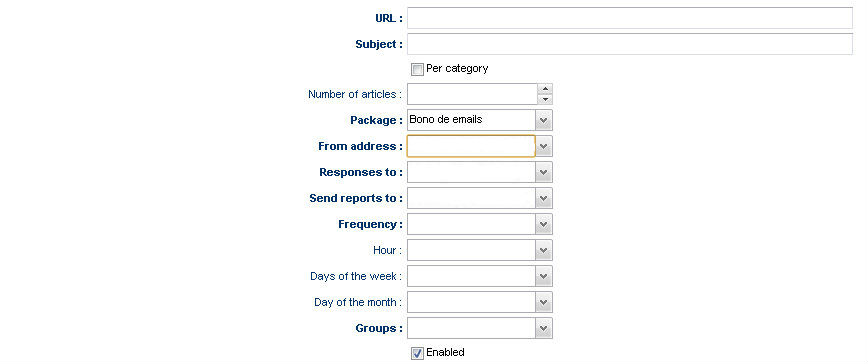
The options are very simple:
– URL: the URL of the RSS feed you want to use, usually it will be from your blog or website.
– Subject: The subject of the newsletter that your subscribers will see.
– By Category: This is an advanced option that we will see later, for now you can leave it unchecked.
– Number of items: the number of items to be included in each message.
– Package: this is the package that is available in your Mailrelay account, normally you only have one value to select in this field.
– From address: in this field you must select the sender email to be used.
– Send responses to: In this field you will select the email address to send responses.
– Send reports to: in this field you must select the address that will receive the reports.
– Frequency: Select the frequency for the newsletters to be sent. There are several options, manual, daily, weekly or monthly.
– Time: The time of day to send the message.
– Day of the week: on which day of the week the messages will be sent.
– Day of the month: day of the month in which the message should be sent:
– Groups: Select the group of subscribers to which you want to send the email.
– Enabled: checked by default to enable the campaigns by RSS.
With the parameters selected, you just need to prepare the template to be sent, which can be created as usual, or using a normal template with the online editor. In this template, you can use the following fields in the place where you want the system to insert the RSS elements:
[rss_item_title] -> To insert the title.
[rss_item_content] -> To insert the content.
[rss_item_description] -> To insert a description.
[rss_item_link] -> To insert the link to the entry.
[rss_item_category] -> To insert the category.
[rss_item_pub_date] -> To insert the publication date.
Other general fields that you can use are:
[rss_channel_title] -> The channel title.
[rss_channel_description] -> Channel description.
[rss_channel_link] -> Link to the channel.
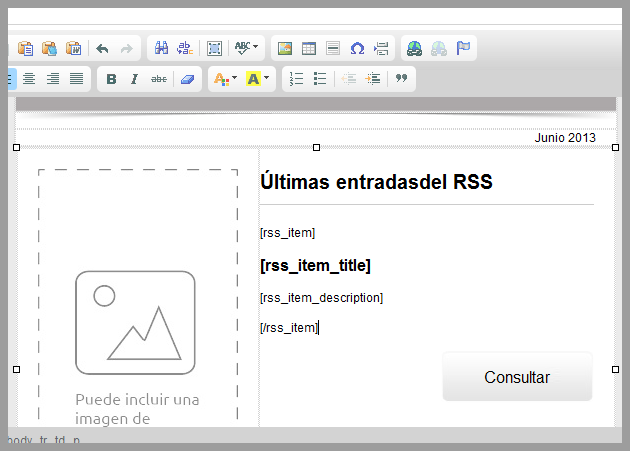
Let’s see an example of how it would look:
The field that organizes all the entries by placing them one after the other is:
[rss_item]
It is important that you include it, otherwise several entries will not be displayed. The design that we showed as an example is very simple, but the idea is that by placing these labels where you want , when sending the messages, the system will insert the contents of each entry to the newsletter, taking the information from the RSS feed.
In the example above, you can see that we added this code:
[rss_item]
[rss_item_title]
[rss_item_description]
[/rss_item]
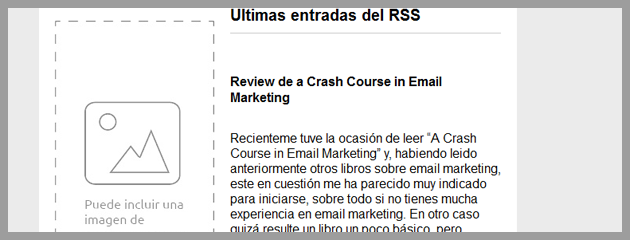
And after sending the message you can view something similar to:
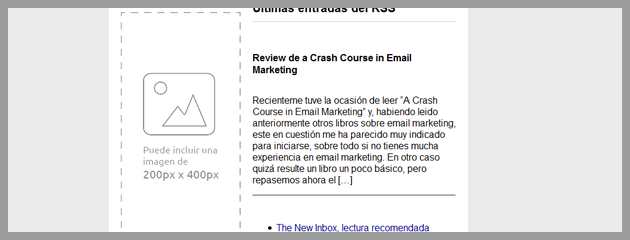
Obviously this will depend on the template in which you added the code, and how the template was created, but as you can see, it isn’t an extremely complex process, once you have the template ready, the system will handle practically everything else. Thanks to this feature you can automate a part of your email marketing campaigns, perhaps the most grueling, as it is very boring to spend hours creating and sending emails daily or several times a week with information about new contents on your website or blog.
That way, you can focus your efforts and energy in special campaigns and work on the contents to be sent.
Let’s now see the option ” By Category”
In the previous example we saw how to configure a RSS campaign, simply adding the RSS link on the platform and the system added in the email all the entries from the RSS one after another. But let’s assume that your RSS is divided by categories, categories of your blog , for example in Mail relay we have:

In this case, you might want to add a few categories to the newsletter, not all of them. As an example, let’s say you want to send only the categories Press or Opinion and Analysis. In this case, you would have to create a newsletter using this code:
[rss_item]
[rss_item_title]
[rss_item_description]
[/rss_item]
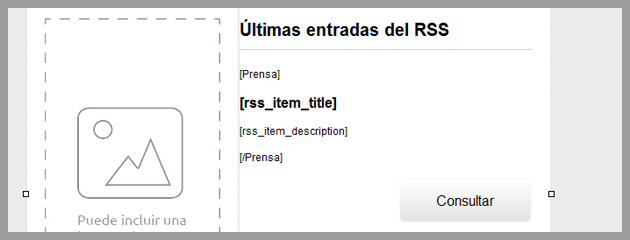
You would use the category code:
[Press]
[rss_item_title]
[rss_item_description]
[/Press]
or
[Opinion and Analysis]
[rss_item_title]
[rss_item_description]
[/Opinion and Analysis]
Let’s test it on an example, the most important point is to select the option By categories:
With this option the system always loads the last, and only the latter, Article from the selected category. Applied to the previous design, we would have something similar to the following image:
Thus, when the newsletter with the RSS is sent, the system will load the last entry for the press category:
This option by categories is very useful for news websites, as it allows you to work and create better designs, for instance, structuring them in columns:
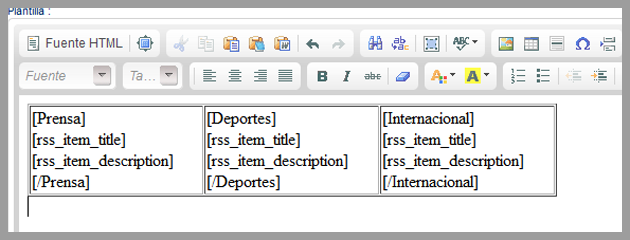
Always loading the latest news from each category, offering to the designer complete freedom to create amazing layouts. We hope you enjoyed this new feature , be sure to share with us your opinion .